This turkey is moist and delicious. If you are using a frozen turkey, place the turkey in the refrigerator for about 4 days before you plan to cook it in order to thaw it out. Make the brine for the turkey the night before you cook the turkey. Leave enough time for the brine to cool. The turkey should sit in the brine for 6 hours so leave yourself enough time for the turkey to soak either the night before you cook the turkey or soak it early the morning your are cooking the turkey. This recipe was derived from Alton Brown’s Good Eats Roast Turkey recipe.
Tools Needed
New clean 5 gallon bucket
Large pan for turkey to thaw
Large pan to cook turkey
Cutting board
Chef’s knife
Paring knife
Medium microwave safe bowl
Teaspoon measuring spoon
½ cup measuring cup
1 cup measuring cup
Large Boiler or Saucepan
Turkey roasting bag
Wooden spoon
Kitchen scissors or knife
ProbeThermometer
List of Ingredients to Purchase
Grocery store items (by location where I find them)
Meat department
1 10 – 16 pound turkey
Produce Department
Fresh rosemary
Fresh sage
International/Chinese food section
Spice / sugar/flour section
1 red apple
½ cup kosher salt
½ cup light brown sugar
1 tablespoon black peppercorns
1 cinnamon stick
1 tablespoon flour
Other aisles
3 tablespoons vegetable Better than Bouillon
½ tablespoon candied ginger
Canola oil
Oven bag for the size turkey you bought
1 bag of ice
Speciality food store items
( international market, Whole Foods, …)
Allspice berries ( some times the grocery stores will have them with the rest of the spices. They can also be called whole allspice.)
Recipe steps:
Thaw the turkey.
Ingredients needed
Frozen turkey.
Leave the turkey in its original packaging and place the turkey into a pan and place the pan in the bottom of the refrigerator. Leave it in the refrigerator for about 4 days. The reason that you place the thawing turkey into a pan is that if the packaging has any holes, the juice from the turkey will leak out into the refrigerator and leave a mess to clean up.
If you need to thaw the turkey more quickly, place the frozen turkey still in its original packaging into a clean 5 gallon bucket. This bucket should only be used for food preparation purposes. It should have never been used for non food purposes. Place the bucket into either a laundry sink or a bath tub because you will need to change the water about every 2 to 3 hours. Add cold water so that the turkey is covered with cold water. Use a brick or other heavy object to weigh down the turkey to keep it submerged. To empty the water, just carefully gradually tip the bucket over to one side somewhat , not letting the turkey spill out of the bucket. Add new cold water and let it sit for 2 to 3 hours more until it has set for 6 to 8 hours. It should take about 1 hour for every 2 pounds that the turkey weighs.
Remove the neck and other pieces from the turkey.
Ingredients needed
Thawed turkey.
Male sure that you check both openings in the turkey for the neck and other pieces. They will usually be stuffed in one of the holes. You will need to temporarily move the legs off of the device that is holding them in place. Do not discard this device, you will need it to cook the bird. You can put it back on the bird once the bird is cleaned. The turkeys that I have seen either leave a piece of skin or a wire that you can tuck the legs under to keep them for moving around. If the turkey has a popup thermometer stuck in it that is supposed to pop up when it is done, leave it in the turkey so that juices do not flow out of the hole that would be caused if it were removed. Check the outside of the turkey for any pin feathers. Look all over the skin. If you see any tiny feathers or feather quills, carefully remove them. Usually you can just pull them off with your hands. If you have to, cut them off, but try to keep any cuts in the skin as small as you can. Wash the turkey inside and outside. Tuck the legs back into whatever device holds them in place. Make sure that you carefully wash kitchen utensils that the turkey has touched so that you do not spread germs from the raw turkey meat. And make sure to wash your hands well when you are done handling the turkey.
Make the brine for the turkey the day before you need to cook the turkey.
Ingredients needed
Allspice berries
½ tablespoon candied ginger
½ cup kosher salt
½ cup light brown sugar
1 tablespoon black peppercorns
1/2 gallon of water + 3 tablespoonsVegetable Better than bouillion
2 to 3 cups ice
Large Boiler or Saucepan
Wooden spoon
Put allspice berries, ½ tablespoon candied ginger, 1 cup kosher salt ½ cup light brown sugar, and black peppercorns into the large boiler. Add 1/2 gallon of water + 3 tablespoons Vegetable Better than bouillon. Stir together to blend. Place the boiler on high heat. Bring mixture to a boil. You will know that the mixture is boiling when large bubbles coming to the surface of the mixture. Continue stirring until the sugar and salt are dissolved.
When you rub the wooden spoon on the bottom of the pan, you will be able to feel the grittiness of the sugar and salt until they dissolve, then it will no longer feel gritty. Once the sugar and salt dissolve, turn off the heat and move the boiler off of the heat.
Let the mixture cool to room temperature. If you are in a hurry, you can pour the mixture into a metal container. The metal container must be large enough to leave about 3 inches of space at the top of the container. Place about 3 cups of ice directly into the broth to let it cool faster. Place the container into some ice that you have placed in the sink. The ice will help cool the mixture faster. Be careful not to spill the liquid if the ice shifts while melting.
Once the liquid has cooled to room temperature, place it in the refrigerator and let it get cold.
The night before you plan to cook the turkey or early the day you are cooking the turkey, soak the turkey in the brine for 6 hours.
Ingredients needed
1 gallon water
3 to 4 cups of ice
Brine mixture
5 gallon clean bucket with lid
Pour the 1 gallon water, 3 to 4 cups of ice, and brine mixture into the 5 gallon bucket. Place the thawed turkey breast side down into the brine. Cover the bucket. Set in a cool area or refrigerate for 6 hours total. After 3 hours turn the turkey over and let it soak for 3 more hours. The turkey may be a little slippery, so be careful when taking it out and turning it so that the turkey now goes in breast side up into the brine. I like to place the bucket in my laundry room sink and then add the turkey so that if any water overflows it will flow into the sink. After the turkey has soaked for 6 hours, take it out of the brine and wash it well with just water on the inside and outside of the bird.
Prepare the turkey for cooking.
Ingredients needed
turkey
1 red apple
1 cinnamon stick
Fresh rosemary
Fresh sage
Pan or cutting board on which to place turkey to dry it.
Tongs
Small bowl that is microwave safe
Preheat the oven to 350 degrees.
Then you need to prepare the aromatics. The aromatics which will go inside the turkey while it is cooking give it more flavors.
Place a red apple cut into 4 pieces, a cinnamon stick, and one cup of water into a microwave safe small bowl. Cook it in the microwave on high for five minutes. Be careful while taking it out that you don’t splash the water on yourself. Set this aside to let it cool a few minutes.
After the turkey has finished soaking for 6 hours total, place a few layers of paper towels on top of a cutting board. Then take the turkey out of the brine and put it on the paper towels that are covering a cutting board or pan. Discard the brine that the turkey was in. Be careful not to stop up any drains with the brine since it will have large spice pieces. Turn on the water in the sink and hold the turkey under it until it is nice and clean and the water runs clear. Wash the inside and outside of the turkey. Set the turkey back on the paper towels and blot off the inside and outside of the with additional paper towels until it is somewhat dry. It can still be moist, but not just dripping with water.
You may need to again temporarily move the legs off of the device that is holding them in place in order to place the aromatics inside the bird. Using tongs, place the apple and onion and cinnamon sticks that you cooked in the microwave inside the turkey cavity. Also place sage and rosemary inside the cavity. Rub down the bird with canola oil all over.
Then tuck the part of the wing after the second joint (a bit like your elbow) underneath the flap of skin at the base of the wing to prevent the wings from burning.
Again secure the legs with whatever came with your particular turkey to secure the legs. If you had nothing that came with the bird, take a bit of twine or poultry string and tie the legs together.
Cook the turkey.
Ingredients needed
turkey
1 tablespoon of flour
Oven bag for the size turkey you bought
Kitchen scissors or knife
ProbeThermometer
Get out the pan in which you are planning to roast the turkey. If your pan has a rack to roast the turkey on place the rack inside the pan and move the turkey onto the rack.
Make sure that you use a probe thermometer that is designed to stay in the meat while it is in the oven cooking. Place a probe thermometer into the deepest part of the white meat in the turkey breast. Try not to place the thermometer touching the keel bone or the rib bone or it will give a false reading. Some ovens come with a probe. You can also purchase a probe thermometer that will stay in the meat while cooking and beep when the meat reaches a certain temperature.
Take 1 tablespoon of flour and place it inside the oven bag especially designed to cook the turkey. Shake it up well. There will be extra flour left in the bag. That is ok, just leave it in the bag.
Slide the turkey into the Oven bag and secure it closed with the special fastener that came with the bag. Cut about 5 to 6 slits in the top of the bag using kitchen scissors. You can use a knife, but you will need to carefully hold the up and let the knife almost punch a hole. Kitchen scissors are much easier to cut a hole in the bag.
Thread the wire of the probe out of one of the slits that was cut in the bag. Cut a new one if necessary so that the probe wire can come through the bag and go outside the oven to plug into the piece that is one the outside of the oven. Set the probe thermometer to beep when the turkey reaches 167 degrees as an internal temperature for the white meat. The cooking time should be about 2 ½ to 3 hours for a 14 to 16 pound turkey. Once the turkey reaches 167, take it out and check it with a Thermapen Insta read thermometer. I tend to accidently place the probe thermometer too close to one of the bones accidently and the meat near where the legs join the body tends to be under cooked. That is why I always verify the temperature of the turkey several places with an insta read thermometer. Make sure that you poke the turkey in several places and that the temperature in all of the places is at least 167 degrees. Make sure to check all around the legs and different parts of the turkey breast and other parts of the turkey. If any piece is less than 167 degrees place it back into the oven, cook an additional 10 to 15 minutes and check it again. Either take out the probe thermometer or set it to a higher temperature and just ignore it at this point. When all parts of the turkey register 167 degrees or higher, the turkey has finished cooking.
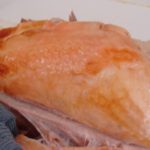
Let it rest for 15 minutes before carving the turkey. Using kitchen scissors, cut many slits into the bottom of the bag to let the juices drain into the pan. Cut the bag into large pieces and carefully remove each piece from the turkey. If the bag is slightly stuck to the turkey, it is ok, just carefully pull it off the turkey. Be very careful with the bottom pieces so that you do not get burned with the hot gravy. The turkey will be lightly browned on the top of the turkey. The bottom of the turkey will not be browned because the juices have been resting against the bottom of the turkey. The turkey will be very moist and juicy.
Move the turkey over to a large cutting board. If you like to carve up the turkey ahead of time so that people can quickly and easily get turkey at the meal. You can also carve the turkey at the table if you wish.
I cover how to carve a turkey in a separate post – How to Carve a Turkey. For the gravy I serve with this turkey, click on Turkey Gravy Recipe.