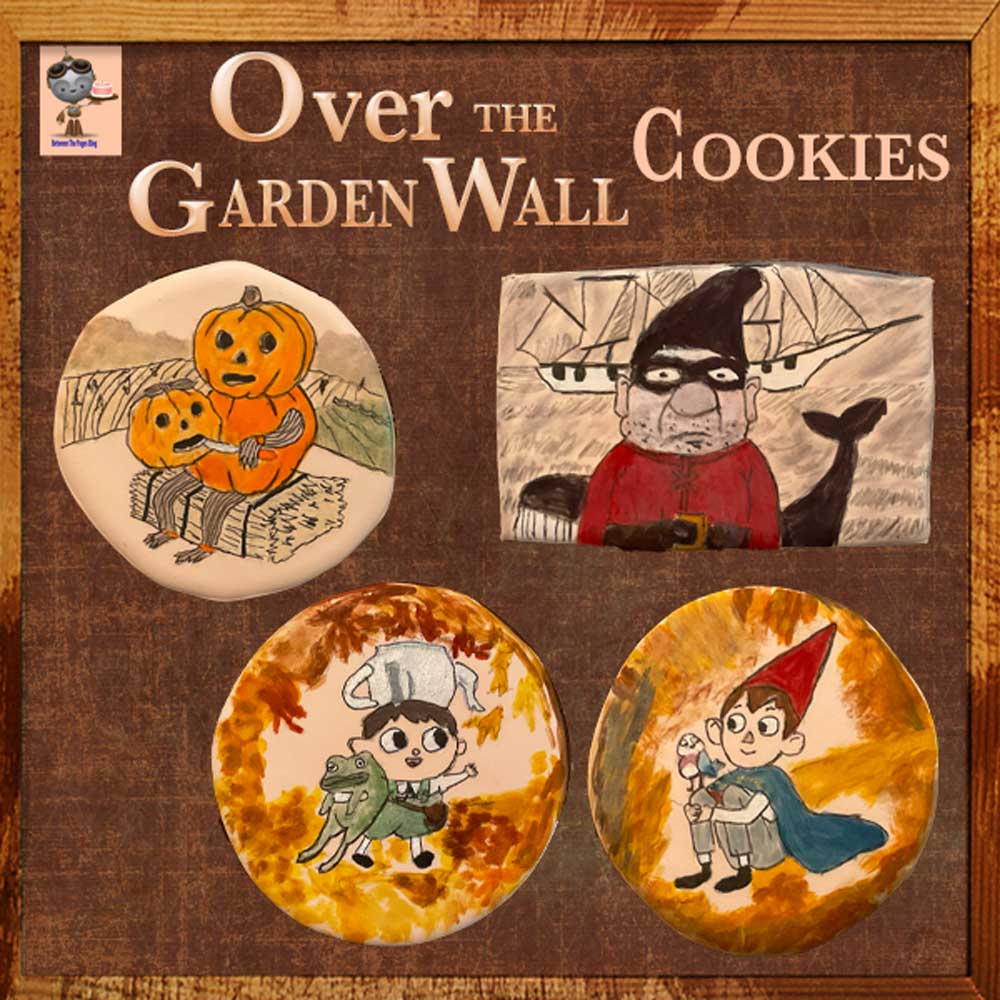
This category contains posts about the cakes, cookies, and cupcakes that I have made.
These include a Captain America Wonder Woman wedding cake and a semi-naked wedding cake with flower corsages.
I made a steampunk Mickey Mouse cake, a Minnie Mouse cake for Icing Smiles, Mickey Mouse Cookies, and Mickey, Minnie, and Olaf St. Patrick’s Day cookies, and a Disney Descendants cake for Icing Smiles.
I made Haunted Mansion cookies that I made for my husband’s birthday.
I airbrushed the Night Before Christmas cake and the Fishing cake.
I made these Disney Baby Yoda cookies for a nice little boy who loves Disney’s The Mandalorian and Baby Yoda.
I looked online and found two How to draw Baby Yoda videos that I liked. I based my cookies on these tutorials.
I wanted one that was cute and faced front. I liked the simplicity and the shading and coloring of this drawing. I also liked the way the inside of the ears were shaded in a golden brown, and the way the robe was multiple shades of golden brown and brown.
In addition, I based my second cookie on this pose of Baby Yoda and colored it to match the first one. I liked the way he look up at the sky in this pose.
I made these Disney Cars cookies featuring Lightning McQueen, Tow Mater, Luigi, Guido, and the Cars symbol for a Christmas present for two of my great nephews.
Steps On How to make these cookies:
First, I looked for a design that could be placed onto a 3 inch round cookie.
Second, I cut out round cookies with a 3 inch cookie cutter and baked them.
Third, I flooded them with white royal icing and let it dry completely.
Fourth, I drew the design of each character onto each cookie.
Black and White Disney Cars Cookies
Fifth, I added royal icing and painted them. The royal icing gave the characters color and dimension. This was the first step after the flooded cookies dried.
Lightning McQueen &Tow Mater Cookies
First, I made a Lightning McQueen cookie using red royal icing for his body and white royal icing for his headlights. Next I painted the headlights yellow and gray.
Second, I made the Tow Mater cookie using medium stiff brown royal icing to give him a rough appearance to show his paint is older and rusting.
Luigi and Guido Cookies
Third, I painted the Luigi cookie yellow and painted his headlights, mirrors, hubcaps, and bumper silver. Next, I made his hat using black royal icing.
Fourth, the I painted the Guido cookie blue, and his fork-lift was black royal icing.
I made these Disney Christmas cookies featuring Mickey Mouse, Minnie Mouse, Donald Duck, Daisy Duck, Pluto, Goofy, Winnie the Pooh, and Uncle Scrooge for my daughter’s birthday.
My daughter’s birthday is in December and we really enjoy going to Disneyland and Walt Disney World as a family so I wanted to make her cookies that were festive and that would represent the fun times we had together at Disney parks.
When you think of Disney, you can’t help but think of Mickey and Minnie so I wanted to make cookies of them.
I based my cookie design on a Disney Santa’s Cookie set that included a white milk jug, a cookie plate for Santa, and a bowl for Pluto’s snacks. I liked the Mickey, Minnie, Goofy, and Pluto on there, and I liked the simple black, white, and red color scheme. Pluto was the only character with an additional color.
Mickey and Minnie Christmas Cookies
Here’s my Mickey and Minnie cookies. I used royal icing to create a Santa hat for each. The ears and nose also have dimension. I gave each cookie a red dot border to draw out the red on other parts of the cookies.
Donald, Daisy, and Scrooge Christmas Cookies
In addition, I added Donald and Daisy Duck and even Scrooge McDuck.
I dressed Uncle Scrooge in all red to keep my original color theme of red, black, and white. His hat is made from royal icing. Daisy has a royal icing red bow. The ducks bills are a golden yellow and match with the color of Pluto.
Goofy, Pluto, and Pooh Christmas Cookies
Furthermore, I included a Pluto cookies. He has green holly leaves and red berries on his red collar. He is wearing a Santa hat too.
In addition, my daughter really likes the Goofy movie and since he is often seen with Mickey, I wanted to have a Goofy cookie too. He is entirely red, white, and black, just like Mickey and Minnie.
Moreover, my family really likes Winnie the Pooh, so I had to include him, even though you do not usually think of him when you think of Mickey and Friends.
I also made a Happy Birthday cookie in the Disney font.
Disney Christmas Cake decorated with Disney Christmas cookies
In addition, my husband’s mother’s birthday is also in December and I wanted to use a Disney Christmas theme there too so I used Disney Christmas cookies to decorate two cakes. I wrapped the cakes in plastic wrap for transport and to preserve the cake.
The first cake has a strawberry filling and is covered in buttercream. I placed the Mickey Mouse cookie on the side of the cake and the Happy Birthday cookie on the top.
The second cake is an almond pound cake. I placed a Minnie Mouse cookie on top it.
Here’s some in progress shots of the cookies.
Trace designs and color in eyes and faces
I first traced the character design onto the cookies that were flooded with white royal icing.
Next, I used black edible marker to color in the black eyes of the characters.
At this point, I also painted Pluto and Pooh golden yellow and painted Donald’s and Daisy’s and Scrooge’s bill yellow.
add black royal icing for ears and nose
Second, I filled in the ears and noses of Minnie and Mickey with black royal icing to give them dimension.
Furthermore, I filled in Goofy’s ears and nose and Pluto’s ears and nose and Pooh’s nose with black royal icing. The black sections that were not touching other wet royal icing were done at this time.
I filled in Mickey’s shirt with red royal icing since it was not touching any other icing. I should have also done his nose, but I forgot and had to do it later.
Add red icing for hat and shirt and collar
Third, once the ears dried, I filled in the Santa hat with red royal icing and used black royal icing to fill in his nose that I forgot in the last step.
In addition, I filled in the red of Minnie’s hat and Minnie’s shirt. I also filled in the red of all of the Santa hats and Daisy’s bow and Scrooge’s hat and part of Pluto’s collar and his tongue.
add white icing for hat
Once the red royal icing dried, I filled in the white parts of the Santa hat. I used an edible black marker to fill-in in the black parts of Mickey’s face, which could have been done when I filled in his eyes earlier.
Now, the Mickey Mouse Christmas cookie was complete.
I filled in the other characters with black, red, and white royal icing filling in as many sections as possible without filling in sections that were adjacent until that particular Disney Christmas cookie was complete.
I am writing this Mickey Halloween Cookie tutorial to show how I made these cookies. I made them for my husband’s birthday which is close to Halloween.
We are both big fans of Disney and love Mickey’s Not So Scary Halloween Party at Walt Disney World. For this reason, I decided to make these cookies for his birthday.
Plan cookie design
First, I had to take some time and decide what I wanted the cookies to look like. The cookies I chose to make are Mickey Mouse pumpkins, Mickey and Minnie ghosts, Mickey and Minnie Candy Corn ghosts, and a Steamboat Willie Mickey cookie with the word Boo, and a heart with a sketch of Mickey with the words, Happy Birthday.
Bake cookies
Second, I made gingerbread cookies based on Lila Loa’s recipe.
I used two 1/4 inch dowels on either side of my cookie mat and had my rolling pin ends rest on the dowels so that the cookie dough would be 1/4 inch high and level. I used 2 thin rulers to keep the dowels from rolling away.
Here’s a picture of my cookie mat and dowels.
Next, I decorated them with royal icing and then airbrushed some of them and handpainted some of the features.
How to make Mickey pumpkin cookies
For this Mickey’s Not So Scary Halloween Cookie tutorial, let’s start with these Mickey pumpkin cookies. I based them on the pumpkins that are at Walt Disney World in October.
Firstly, I cut out the cookies using my Wilton Mickey head cookie cutter. This makes a nice sized cookie for eating.
Second, after preheating the oven, I cooked them for 11 minutes at 350 degrees. This produced a nice soft cookie that could be decorated.
Thirdly, before starting to decorate these cookies, I found a picture I liked of a Mickey pumpkin face.
Make and use Stencil of pumpkin face features
Then I printed it out onto cardstock and used a Swann Morton scalpel to cut out a template to place over each cookie.
I really like the Swann Morton scalpel blades. They are cheap and easy to replace when dulled. These are the blades that I use.
There are 100 in each box. I use both 10A and 11 blades depending on what I need to cut.
In addition, I found this very helpful video on how to insert and remove the blades.
Fourth, I stenciled faces onto the Mickey Mouse gingerbread cookies.
Here’s the stencil I made. It has black icing on it from the cookies I stenciled.
I took stiff black royal icing and scraped it over the stencil onto the cookie. Then I used a piece of stiff plastic scraper to take off all excess. It was very similar to this one.
Afterwards, carefully lifting off the stencil, the face imprint was left on the cookie.
Since the stencil was against the cookie that side stayed clean so I was able to use 1 stencil to make all 12 of the pumpkin cookies.
pipe orange royal icing
Fifth, I used orange royal icing to trace around the eyes, nose, and mouth. I then filled the cookie in sections, doing the outside, and the very middle first.
Then I put in front of a fan to dry.
Sixth, I filled in other sections of orange, always doing sections that were not touching.
It took several times with drying in front of a fan in-between to do all the sections on the main pumpkin and the small pumpkin ears.
airbrush cookies
Seventh, I put orange airbrush color with a drop or 2 or white to lighten it into the airbrush to paint around the edges of the pumpkin and in some of the ridges. This gave the pumpkins an almost florescent look.
I waited until after I was ready to paint the orange stripes onto the candy corn so that I used the orange paint once.
How to make Mickey Candy Corn Ghost Halloween Cookies
I thought they were just so adorable that I had to make some.
First, I used a cookie cutter shaped like the clubs suite in a deck of cards to cut to the body. It was similar to this one.
Secondly, I used a small circle to cut out the ears. I picked a size that looked best with the club cookie cutter.
Thirdly, I used my fingers to reconnect the dough.
flood cookies
Fourth, once the cookies were cooled, I flooded them with white 30 second icing and placed them under a fan to let them dry.
Pipe the face
Fifth, after the cookie dried under the fan, I piped the ears, eyes, nose, and mouth with black icing that was a little thicker.
Sixth, I used the orange royal icing from the pumpkin cookies to pipe Minnie’s bow onto the cookie.
I used disposable bags and cut a small hole in the bag to pipe the icing. These bags are nice and thick. I used the scalpel to cut the end of the bag and slight trim the seam at the end.
Here’s the disposable decorating bags that I used.
Seventh, I put the cookies under a fan after each stage to let them dry.
airbrush cookies
Eighth, I put yellow airbrush color into my airbrush and painted the bottom section yellow.
Nineth, I put orange airbrush color that I used for the pumpkins and painted a small stripe across the middle of the cookie. I waited until both the pumpkins and these ghosts were ready and painted both orange at the same time.
Tenth, I put the cookies back under the fan to dry.
How To make Mickey Ghost Cookies
Next, what are halloween cookies without ghosts, so I made 2 different types.
The other ghosts were based on the 2013 Disney Halloween Mickey ghost pin.
For the bell ghosts, I used a bell shaped cutter and cut the bottom straight across and cut the notch off the top using my scalpel blade. I used small circles for the ears again and used my fingers to blend the cookie dough back together.
This is a similar bell cookie cutter.
For the smaller ghosts, I made a template from parchment paper and used my scapel to cut out each one by hand and then also used the small circle cutter for the ears. I tried a bear cutter for this too, but the ears, were a little too small, so I decided to used my own template based on the Disney trading pin.
Mickey Birthday Cookies
I found a black and white heart shaped Mickey Mouse cookie made by belous_ylia that I really liked, and I tried to recreate it so Mickey could say Happy Birthday.
I put on the words, Happy Birthday, and colored Mickey’s shoes orange to be color coordinated with the other cookies.
I also wanted to do a Steamboat Mickey cookie . It was based on a treat that was available at Disney’s California Adventure Park in Disneyland. Their Mickey was printed onto white chocolate. I wanted to keep with the halloween theme, so I wrote the word BOO and painted his hat, shoes, and shorts orange.
For both of these designs, I traced the design onto the cookie using my iPad and Camera Lucida app. It is a great way to draw a design from a picture onto a cookie.
The plain gingerbread Mickey heads can be eaten as they are, but they are also the start of my pumpkin cookies.
I worked on the multiple designs in stages.
bake cookies and stencil on faces
flood large areas of all cookies
Next, I flooded the large areas of all of the cookies with white royal icing.
Thirdly, I piped in the black eyes, eyes, nose, and mouth. I used a tiny brush to first outline the design and drew the lines for the mouth and Minnie’s eyelashes and the bottom lines on the small ghosts.
add ears and face to cookies
Next I piped in the ears and the facial features.
Here’s a final in-progress picture with more of the ghosts details filled in.
Finally, I hope you have enjoyed this tutorial and that you have as much fun making them as I did.