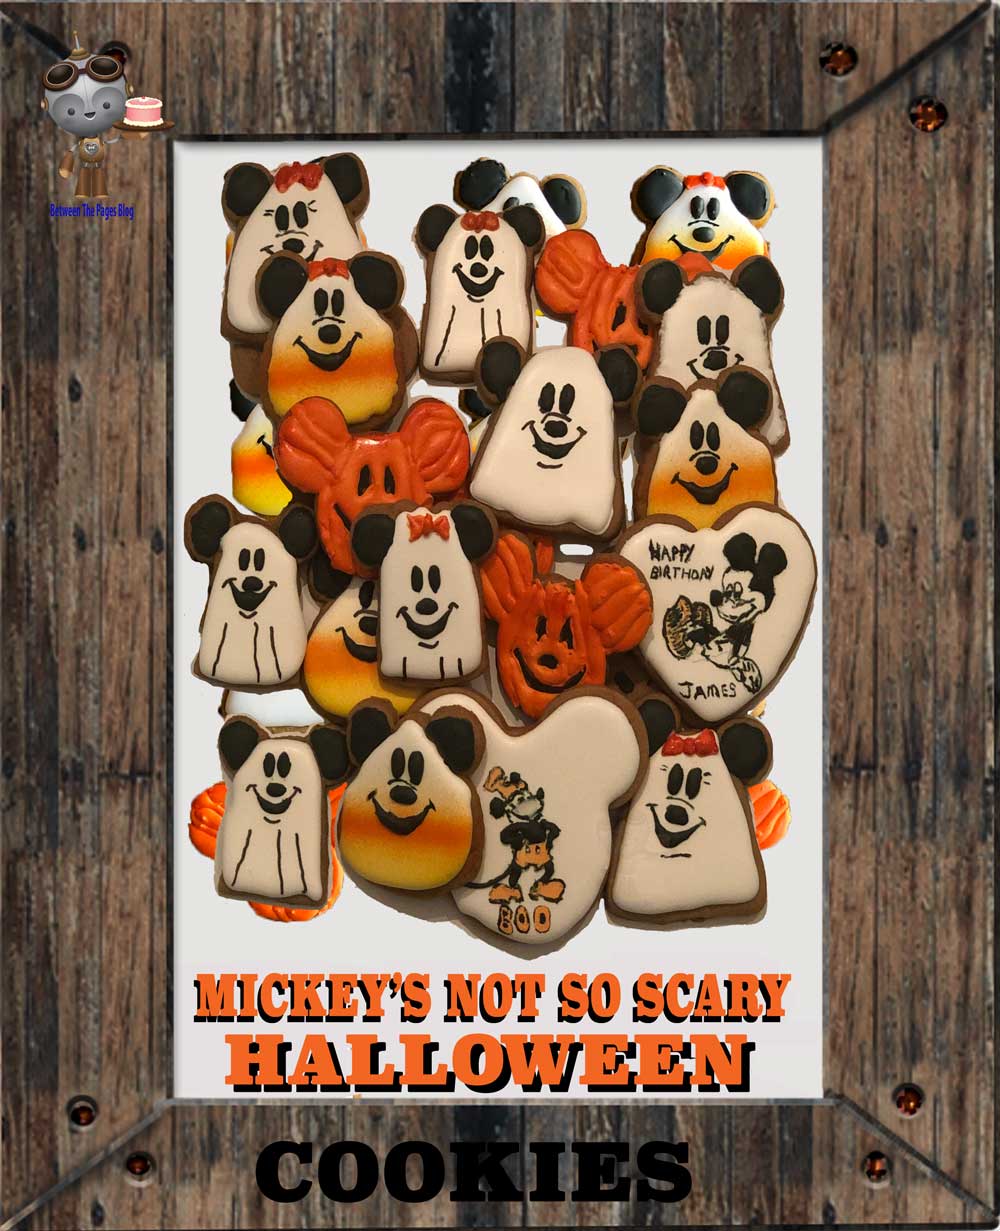
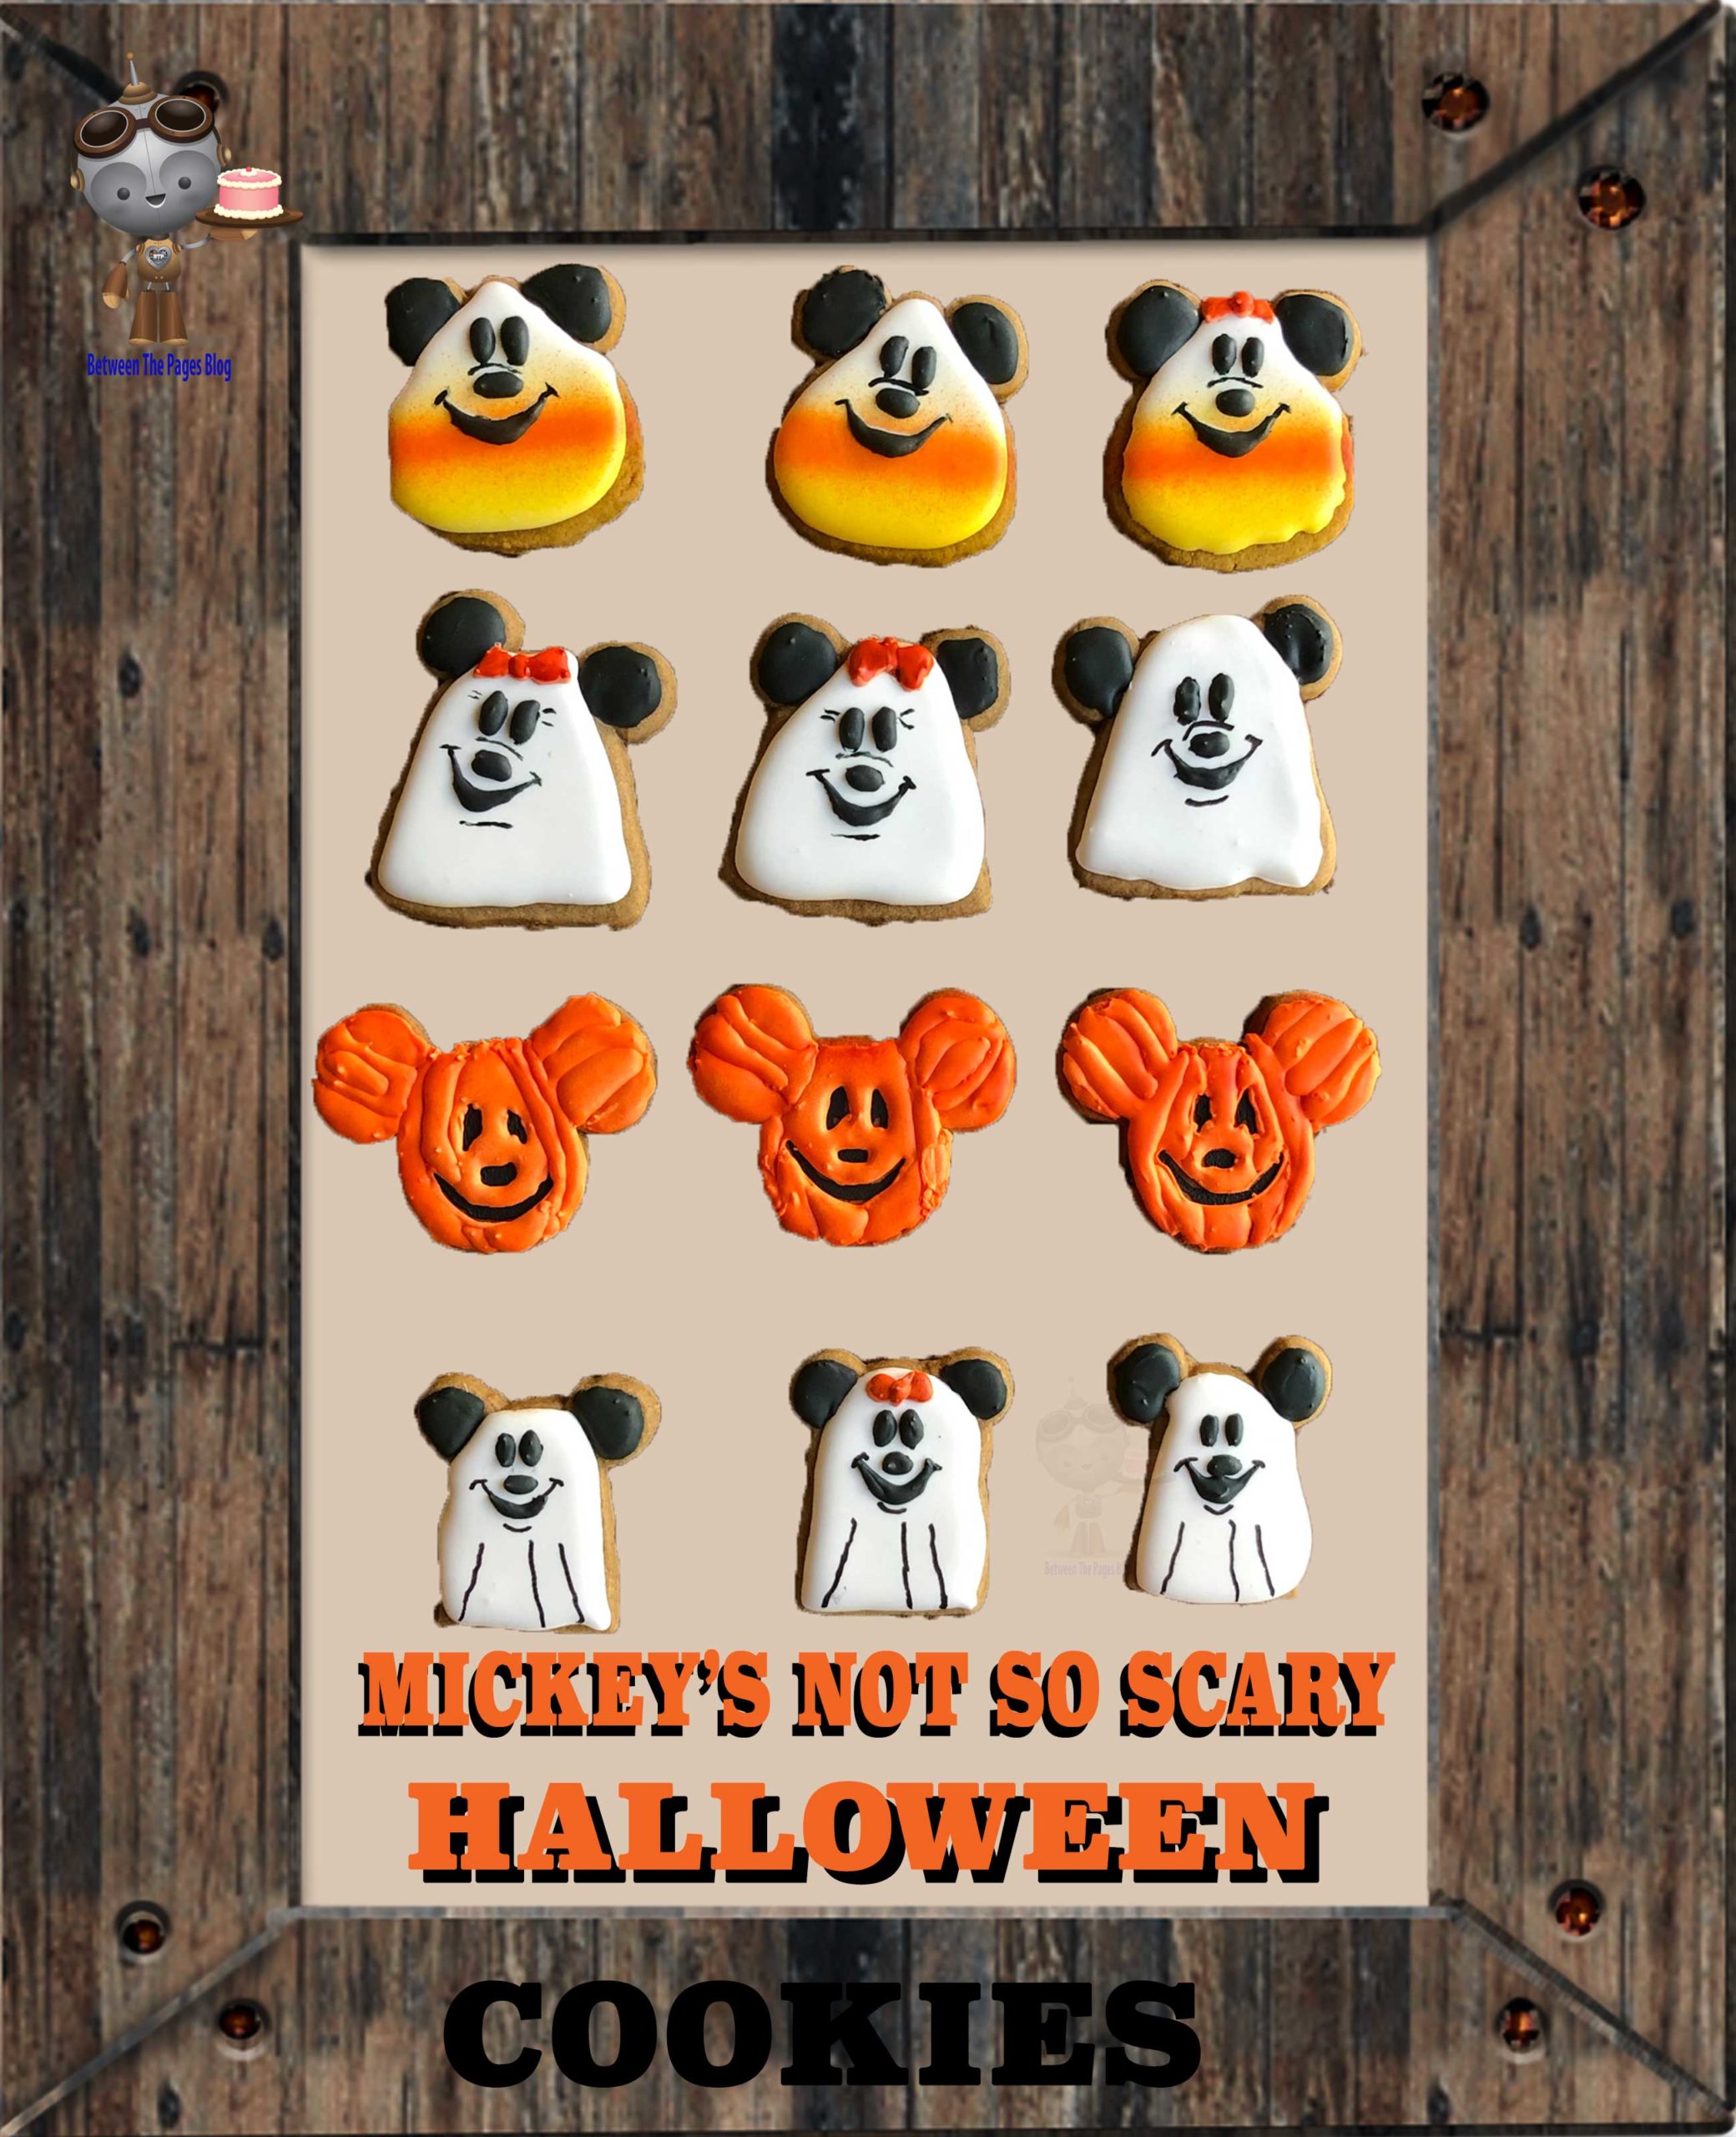
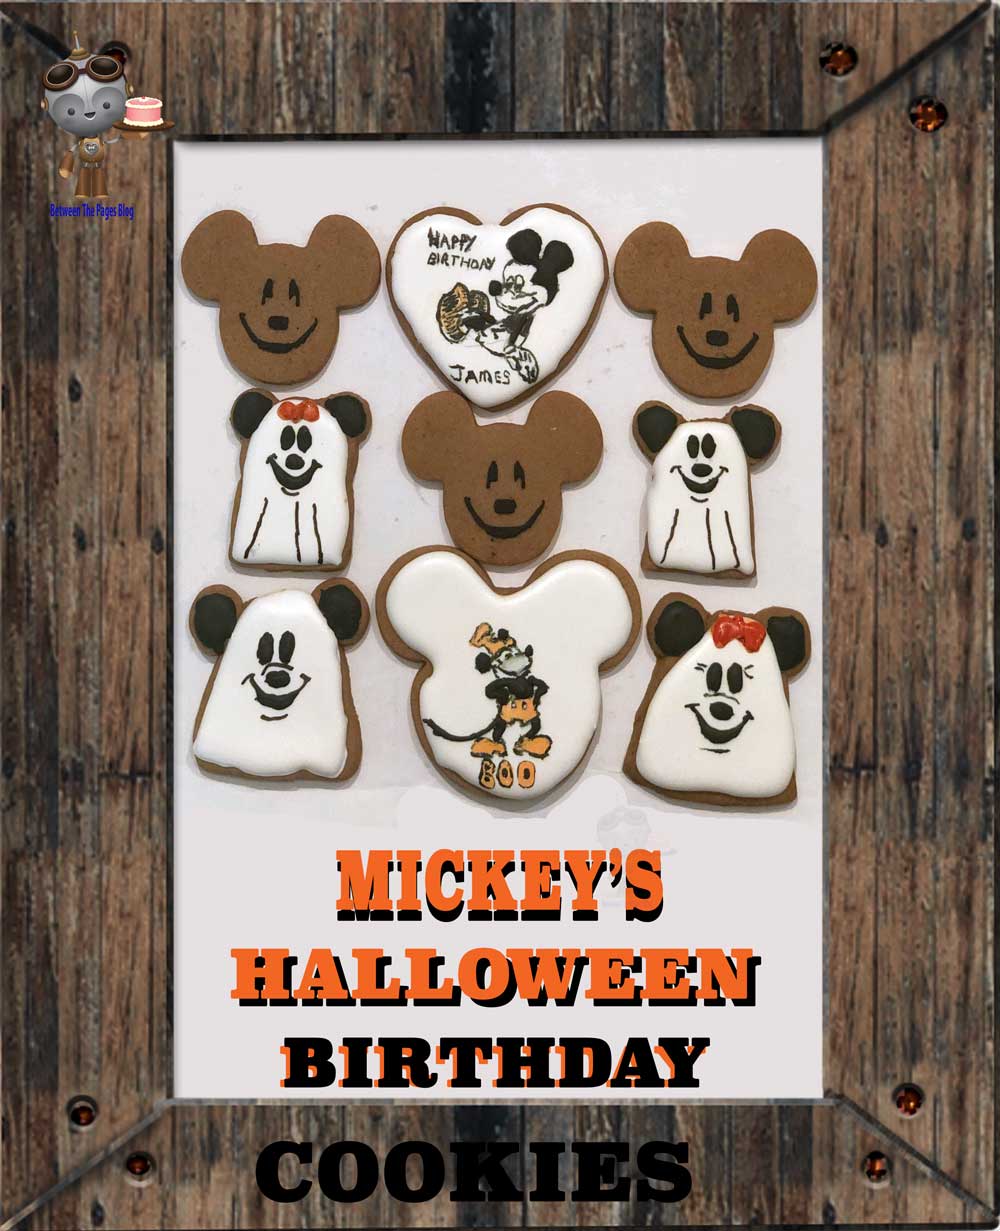
Mickey’s Not So Scary Halloween Cookie Tutorial
I am writing this Mickey Halloween Cookie tutorial to show how I made these cookies. I made them for my husband’s birthday which is close to Halloween.
We are both big fans of Disney and love Mickey’s Not So Scary Halloween Party at Walt Disney World. For this reason, I decided to make these cookies for his birthday.
Plan cookie design
First, I had to take some time and decide what I wanted the cookies to look like. The cookies I chose to make are Mickey Mouse pumpkins, Mickey and Minnie ghosts, Mickey and Minnie Candy Corn ghosts, and a Steamboat Willie Mickey cookie with the word Boo, and a heart with a sketch of Mickey with the words, Happy Birthday.
Bake cookies
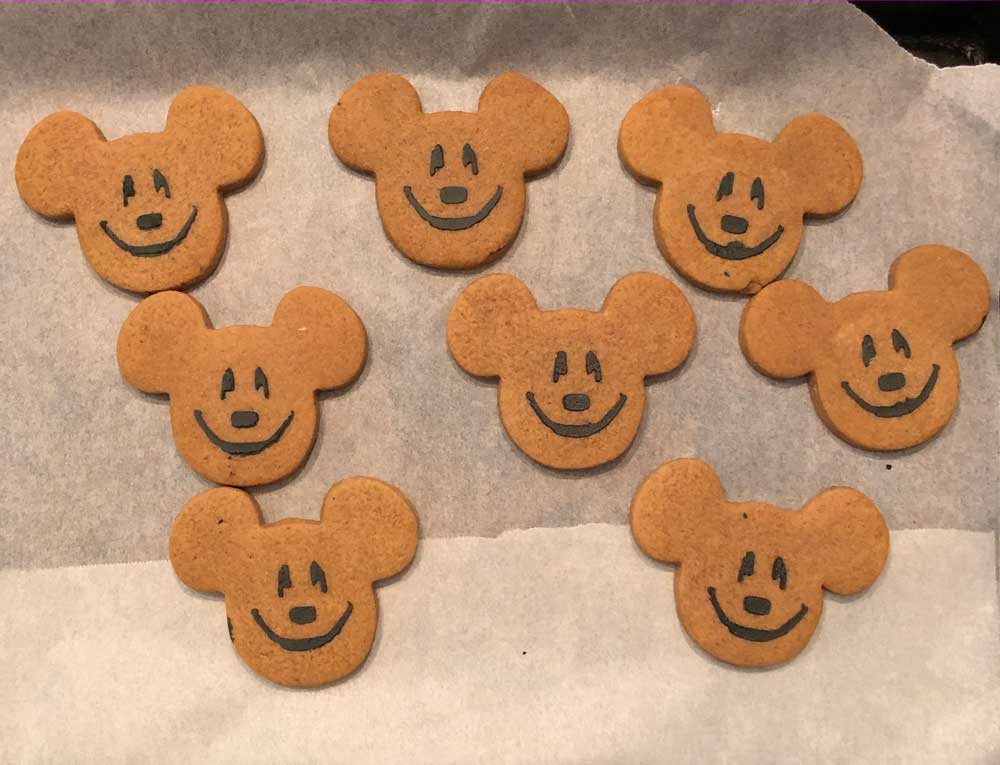
Second, I made gingerbread cookies based on Lila Loa’s recipe.
I used two 1/4 inch dowels on either side of my cookie mat and had my rolling pin ends rest on the dowels so that the cookie dough would be 1/4 inch high and level. I used 2 thin rulers to keep the dowels from rolling away.
Here’s a picture of my cookie mat and dowels.

Next, I decorated them with royal icing and then airbrushed some of them and handpainted some of the features.
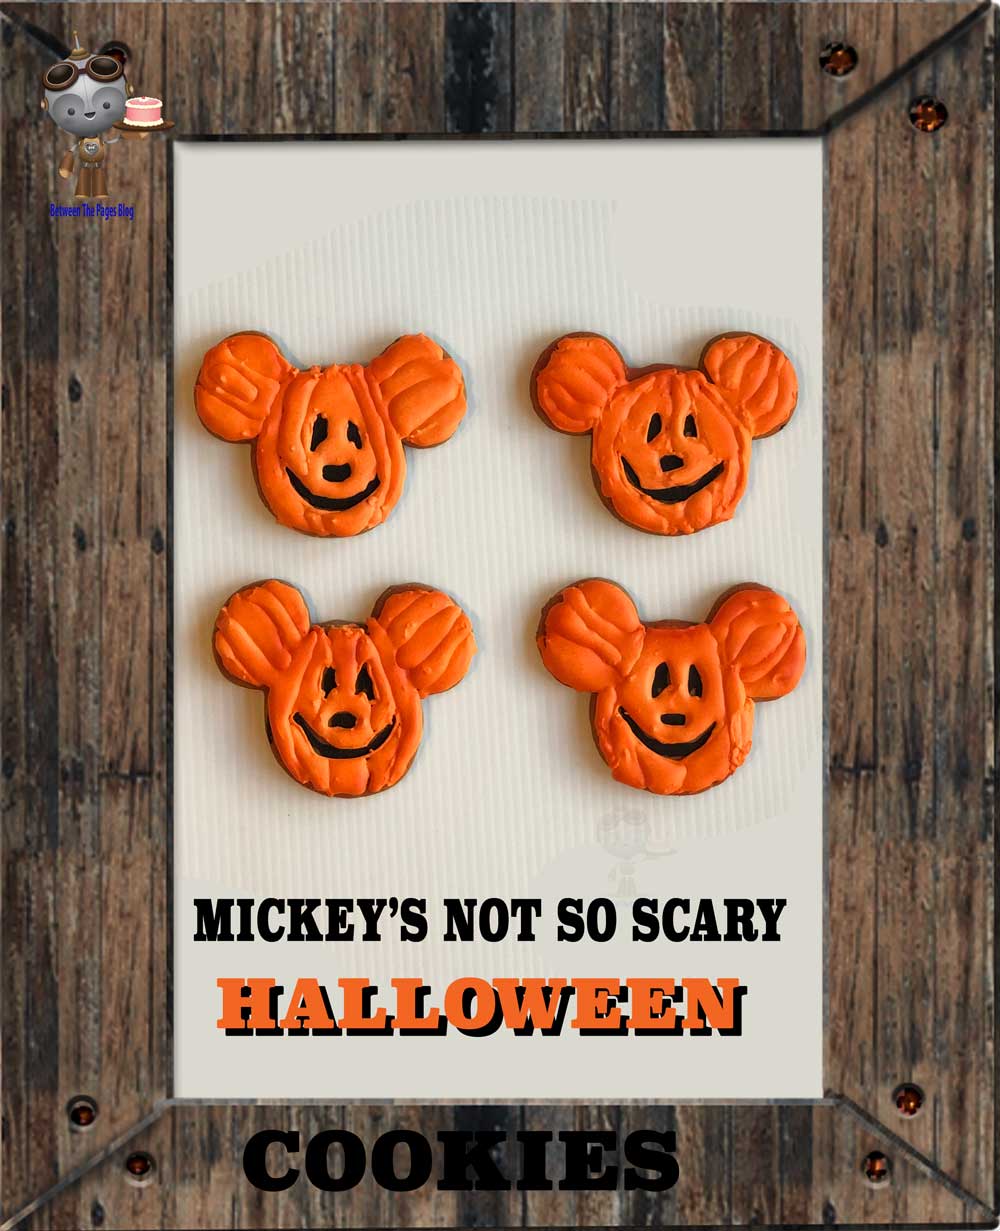
How to make Mickey pumpkin cookies
For this Mickey’s Not So Scary Halloween Cookie tutorial, let’s start with these Mickey pumpkin cookies. I based them on the pumpkins that are at Walt Disney World in October.
Firstly, I cut out the cookies using my Wilton Mickey head cookie cutter. This makes a nice sized cookie for eating.
Second, after preheating the oven, I cooked them for 11 minutes at 350 degrees. This produced a nice soft cookie that could be decorated.
Thirdly, before starting to decorate these cookies, I found a picture I liked of a Mickey pumpkin face.
Make and use Stencil of pumpkin face features
Then I printed it out onto cardstock and used a Swann Morton scalpel to cut out a template to place over each cookie.
I really like the Swann Morton scalpel blades. They are cheap and easy to replace when dulled. These are the blades that I use.
There are 100 in each box. I use both 10A and 11 blades depending on what I need to cut.
In addition, I found this very helpful video on how to insert and remove the blades.
Fourth, I stenciled faces onto the Mickey Mouse gingerbread cookies.
Here’s the stencil I made. It has black icing on it from the cookies I stenciled.
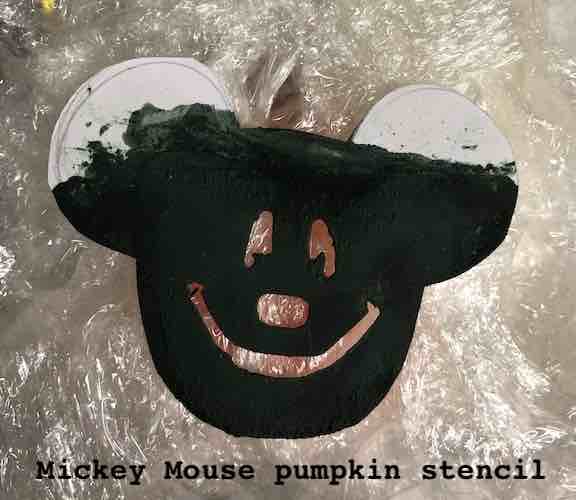
I took stiff black royal icing and scraped it over the stencil onto the cookie. Then I used a piece of stiff plastic scraper to take off all excess. It was very similar to this one.
Afterwards, carefully lifting off the stencil, the face imprint was left on the cookie.
Since the stencil was against the cookie that side stayed clean so I was able to use 1 stencil to make all 12 of the pumpkin cookies.
pipe orange royal icing
Fifth, I used orange royal icing to trace around the eyes, nose, and mouth. I then filled the cookie in sections, doing the outside, and the very middle first.
Then I put in front of a fan to dry.
Sixth, I filled in other sections of orange, always doing sections that were not touching.
It took several times with drying in front of a fan in-between to do all the sections on the main pumpkin and the small pumpkin ears.
airbrush cookies
Seventh, I put orange airbrush color with a drop or 2 or white to lighten it into the airbrush to paint around the edges of the pumpkin and in some of the ridges. This gave the pumpkins an almost florescent look.
I waited until after I was ready to paint the orange stripes onto the candy corn so that I used the orange paint once.
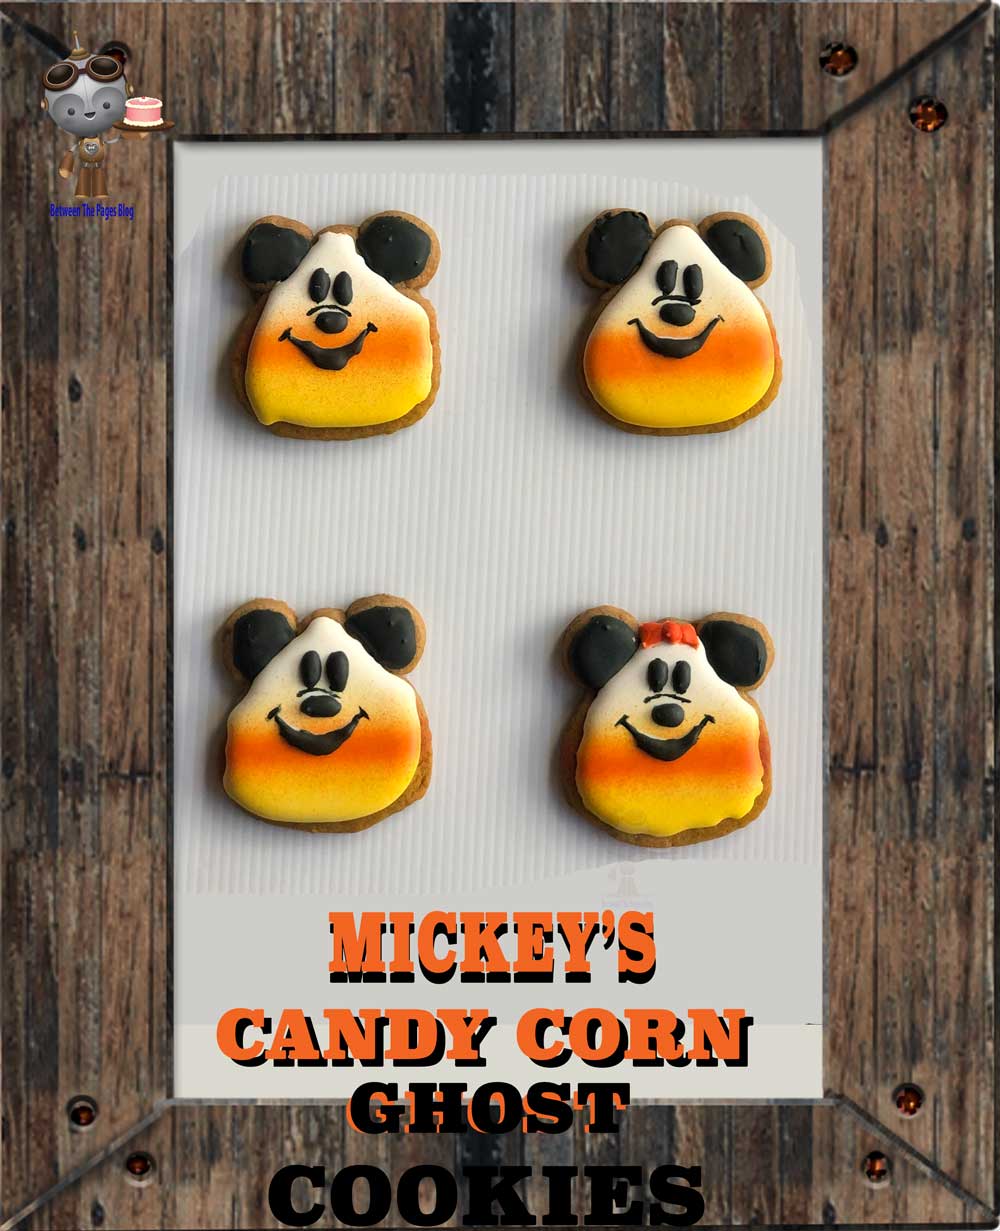
How to make Mickey Candy Corn Ghost Halloween Cookies
I based these Candy Corn ghosts on Mickey Mouse Halloween Cookies made by the wonderfully named Baking My Way To Neverland.
I thought they were just so adorable that I had to make some.
First, I used a cookie cutter shaped like the clubs suite in a deck of cards to cut to the body. It was similar to this one.
Secondly, I used a small circle to cut out the ears. I picked a size that looked best with the club cookie cutter.
Thirdly, I used my fingers to reconnect the dough.
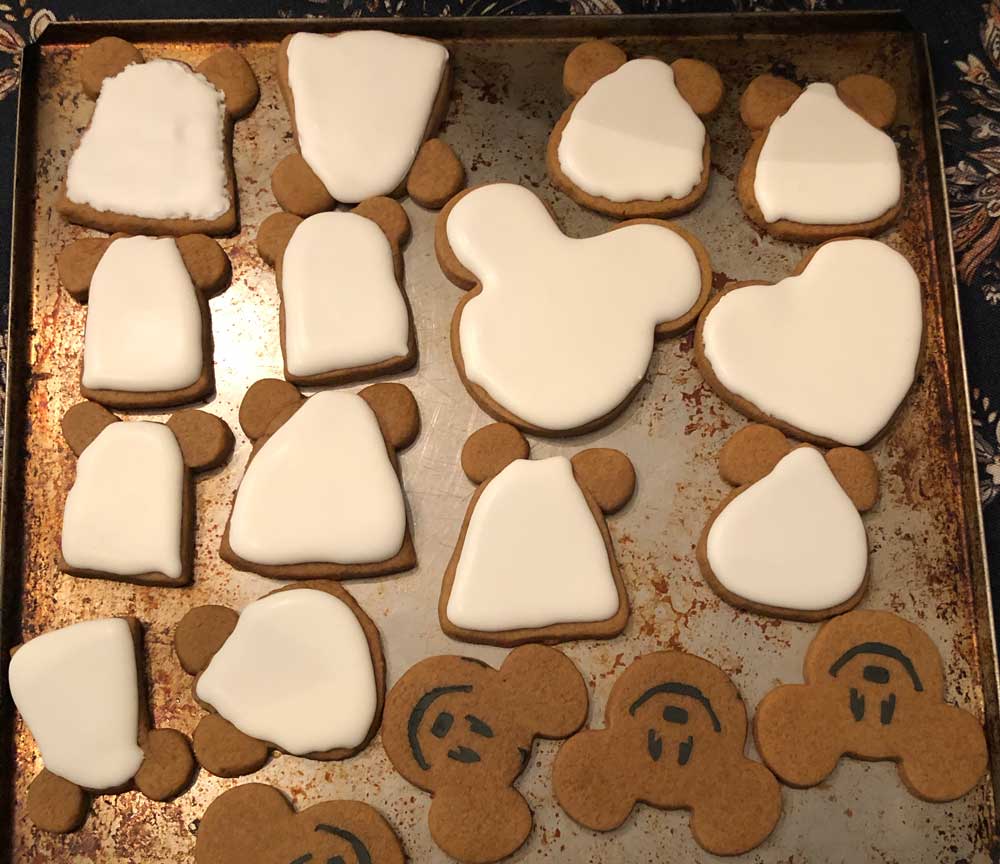
flood cookies
Fourth, once the cookies were cooled, I flooded them with white 30 second icing and placed them under a fan to let them dry.
Pipe the face
Fifth, after the cookie dried under the fan, I piped the ears, eyes, nose, and mouth with black icing that was a little thicker.
Sixth, I used the orange royal icing from the pumpkin cookies to pipe Minnie’s bow onto the cookie.
I used disposable bags and cut a small hole in the bag to pipe the icing. These bags are nice and thick. I used the scalpel to cut the end of the bag and slight trim the seam at the end.
Here’s the disposable decorating bags that I used.
Seventh, I put the cookies under a fan after each stage to let them dry.
airbrush cookies
Eighth, I put yellow airbrush color into my airbrush and painted the bottom section yellow.
Nineth, I put orange airbrush color that I used for the pumpkins and painted a small stripe across the middle of the cookie. I waited until both the pumpkins and these ghosts were ready and painted both orange at the same time.
Tenth, I put the cookies back under the fan to dry.

How To make Mickey Ghost Cookies
Next, what are halloween cookies without ghosts, so I made 2 different types.
I based the bell shaped ghosts on these Mickey and Minnie bell shaped ghost cookies made by Shing Bakes. These are adorable Mickey and Minnie Mouse Ghost Cookies.
The other ghosts were based on the 2013 Disney Halloween Mickey ghost pin.
For the bell ghosts, I used a bell shaped cutter and cut the bottom straight across and cut the notch off the top using my scalpel blade. I used small circles for the ears again and used my fingers to blend the cookie dough back together.
This is a similar bell cookie cutter.
For the smaller ghosts, I made a template from parchment paper and used my scapel to cut out each one by hand and then also used the small circle cutter for the ears. I tried a bear cutter for this too, but the ears, were a little too small, so I decided to used my own template based on the Disney trading pin.
Mickey Birthday Cookies
I found a black and white heart shaped Mickey Mouse cookie made by belous_ylia that I really liked, and I tried to recreate it so Mickey could say Happy Birthday.
I put on the words, Happy Birthday, and colored Mickey’s shoes orange to be color coordinated with the other cookies.
I also wanted to do a Steamboat Mickey cookie . It was based on a treat that was available at Disney’s California Adventure Park in Disneyland. Their Mickey was printed onto white chocolate. I wanted to keep with the halloween theme, so I wrote the word BOO and painted his hat, shoes, and shorts orange.
For both of these designs, I traced the design onto the cookie using my iPad and Camera Lucida app. It is a great way to draw a design from a picture onto a cookie.
The plain gingerbread Mickey heads can be eaten as they are, but they are also the start of my pumpkin cookies.
I worked on the multiple designs in stages.
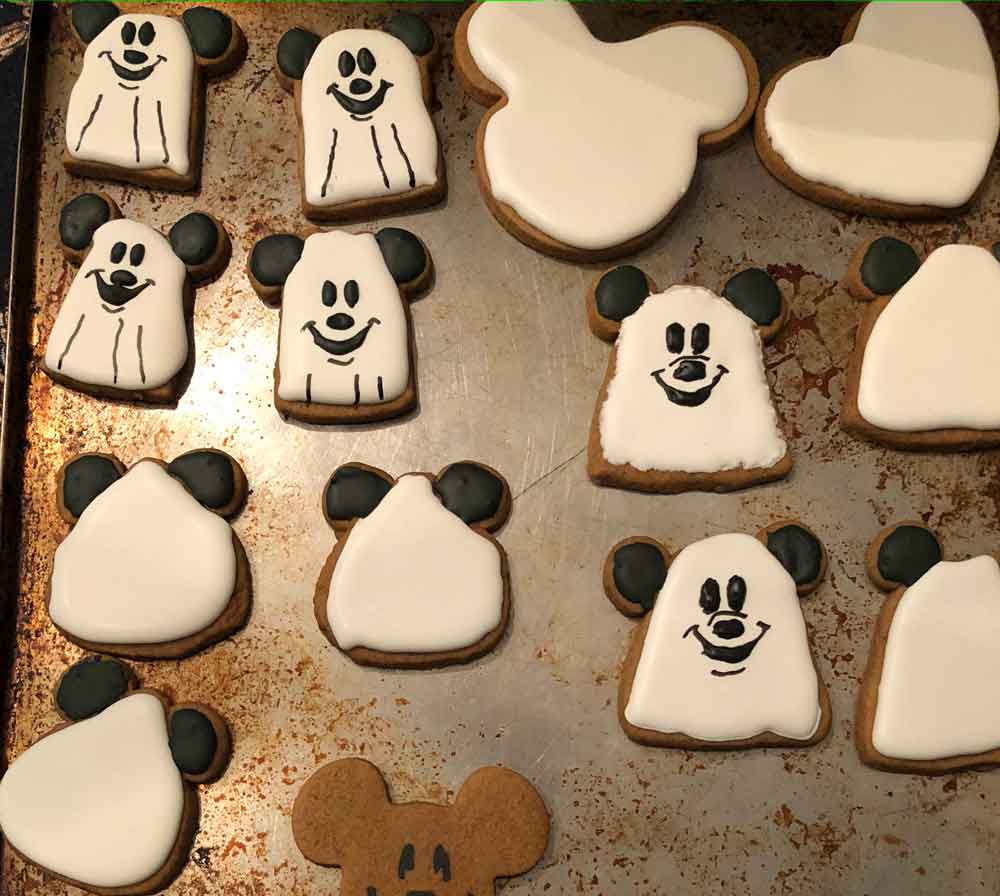
bake cookies and stencil on faces
flood large areas of all cookies
Next, I flooded the large areas of all of the cookies with white royal icing.
Thirdly, I piped in the black eyes, eyes, nose, and mouth. I used a tiny brush to first outline the design and drew the lines for the mouth and Minnie’s eyelashes and the bottom lines on the small ghosts.
add ears and face to cookies
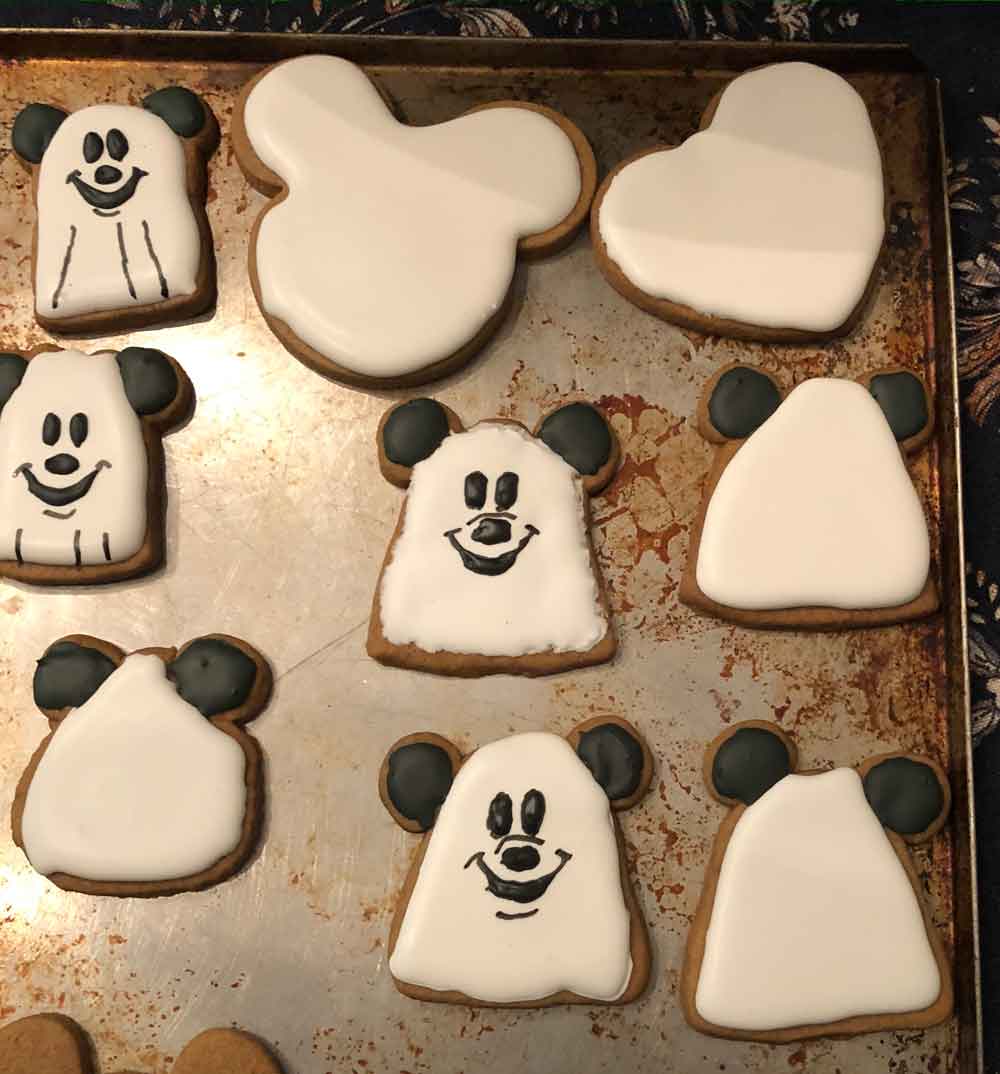
Next I piped in the ears and the facial features.
Here’s a final in-progress picture with more of the ghosts details filled in.
Finally, I hope you have enjoyed this tutorial and that you have as much fun making them as I did.
For more Mickey Mouse sweets, take a look at these terrific Mickey Mouse Cookies and Cakes.