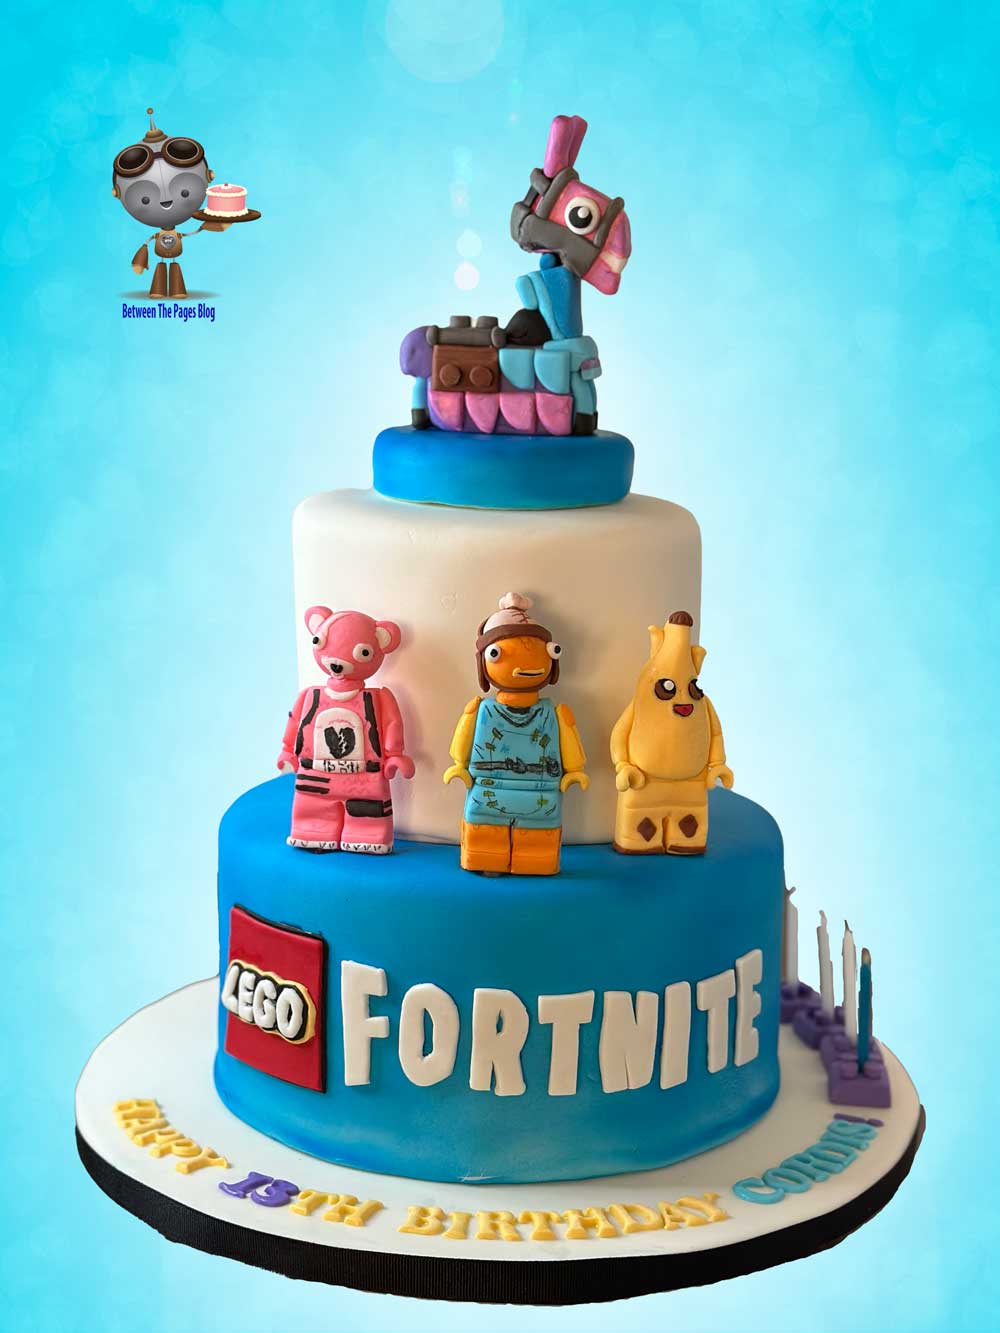
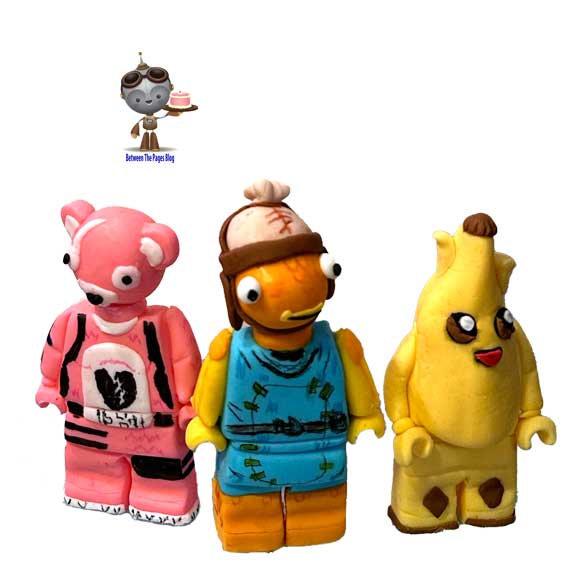
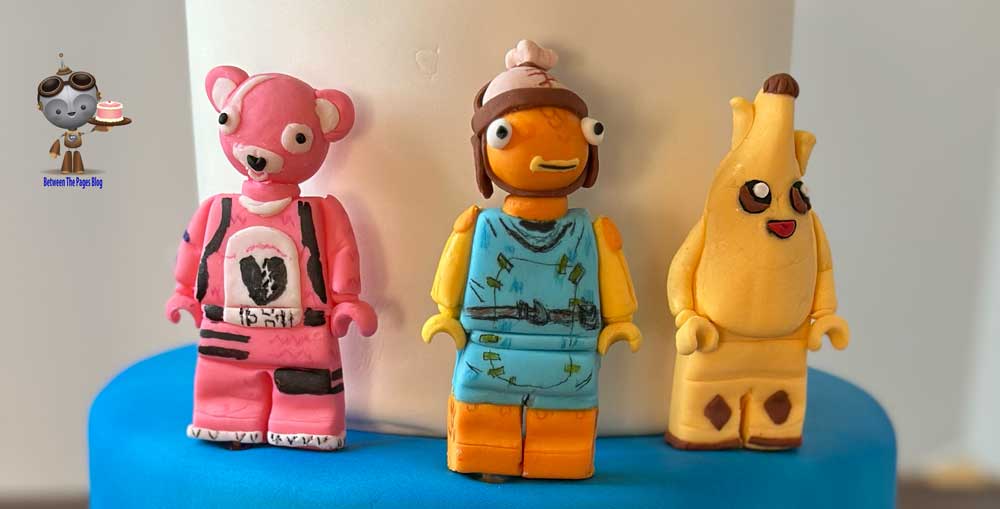
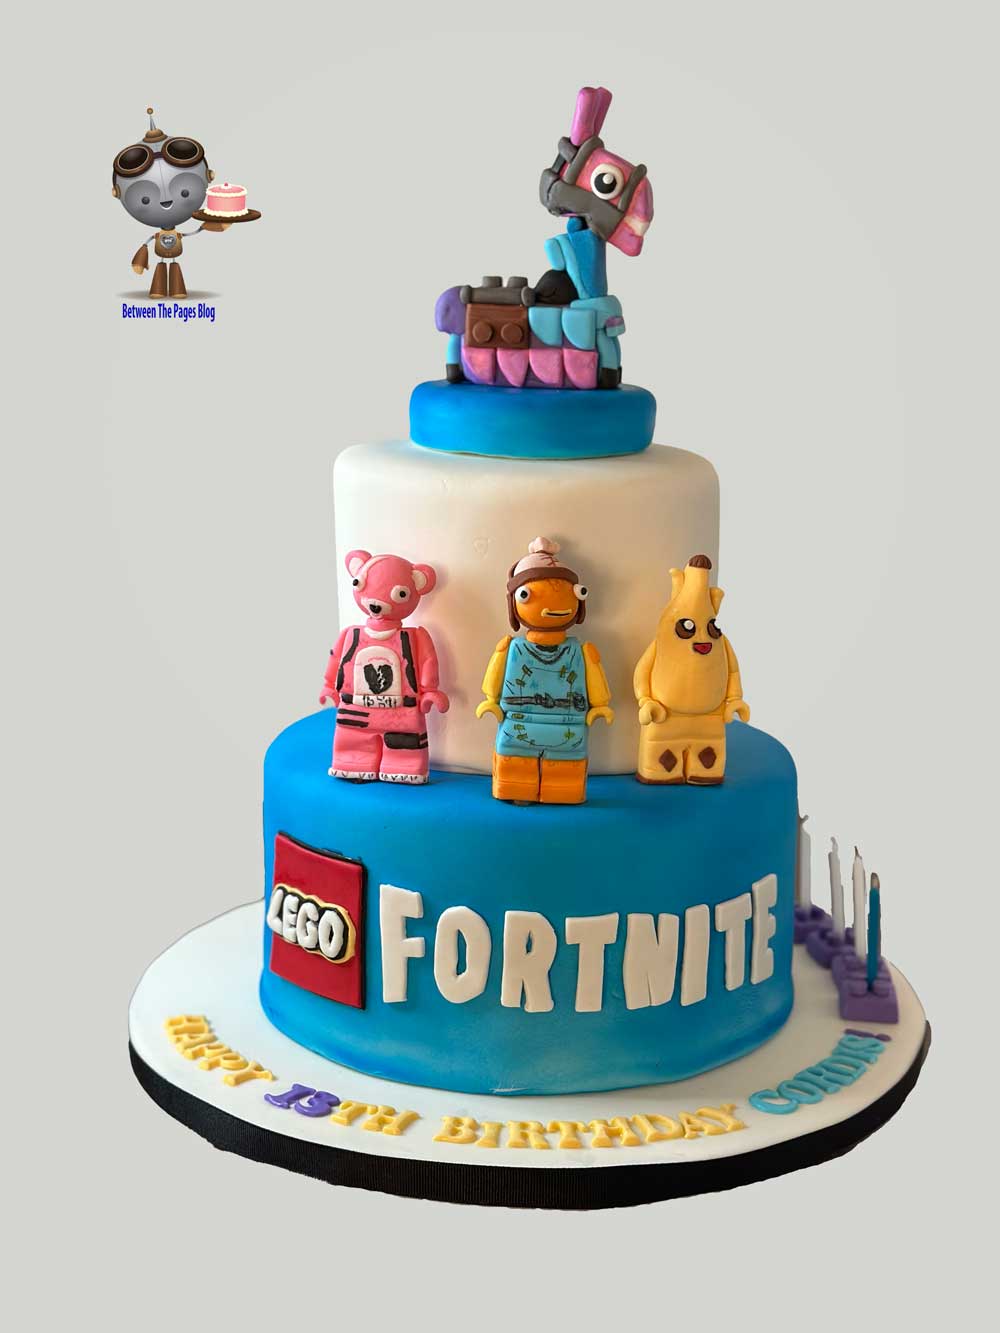
I made this LEGO Fortnite cake featuring fondant LEGO minifigures of Cuddle Team Leader, Fishstick, Peely, and a LEGO Loot Llama Cake Topper. It ranked 2nd in the top 10 cakes of 2024.
This post contains affiliate links and I may earn a small commission when you click on the links at no additional cost to you. As an Amazon Affiliate I earn from qualifying purchases. Betweenthepagesblog.com is a participant in the Amazon Services LLC Associates Program, an affiliate advertising program designed to provide a means for sites to earn commission fees by advertising and linking to the following web sites.- www.amazon.com- Product prices and availability are accurate as of the date/time indicated and are subject to change. Any price and availability information displayed on [relevant Amazon Site(s), as applicable] at the time of purchase will apply to the purchase of this product.
I made this LEGO Fortnite cake for Icing Smiles. This was for the sibling of a medically fragile child. It’s important that the siblings also get to have a cake decorated especially for their birthday celebration. I really enjoy helping these families in this way. When I delivered the cake, the mom and child had a big smile on their faces.
How To Make The LEGO Fortnite Minifigures:
I printed out a picture of a LEGO minifigure that was the size that I needed the figures to be. I wanted my figures to be about 3.5 inches or 9 cm tall so I made my template that size. Then I recreated the body and the head in fondant. Also I added tylose powder to help the fondant dry faster and thus make my own homemade gumpaste. In addition I created the heads separately and attached them using a piece of uncooked spaghetti. The LEGO minifigures were entirely edible. In retrospect, I recommend just using cocktail sticks to attach the head and the character to the cake. I had to be extra careful with the dry spaghetti to make sure it did not break off during transport of the cake.
Making The Minifigure Body
First I kneaded the fondant to make it pliable. Then I rolled out the fondant using the Fat Daddio’s Fondant & Dough Leveler Strips to make the body parts all the same thickness. Then I placed the fondant into the freezer for about 10 minutes to get the fondant cool so it would cut easier. After that I used a Swann Morton scalpel blade to cut out the body pieces using the template I had made. I really like the Swann Morton scalpel blades. They are cheap and easy to replace when dulled. Once I cut the body parts, I put together the legs and the torso if they were different colors.using a bit of edible glue. The edible glue is composed of water and Tylose powder.
Next I placed a piece of uncooked spaghetti into the top of the body where the head would be attached and a piece of spaghetti into one of the legs to attach it to the cake at a later time. After this I let the body lie flat to dry for a few hours.
Making The Arms and Hands
After the body had dried for several hours, I rolled out a thin snake and cut it to the correct size for the arms. Also I cut an angle where the arm joins the shoulder. Then I attached the arms to the body. For the hands, I rolled a thinner piece of fondant and used a small oval cutter to make the LEGO hand shape and curbed it around a brush handle. Next I used a small piece of fondant to attach the hand to the arm.
Creating the Minifigure’s Heads
In addition I created the heads separately. Once I formed and shaped the head. Then I used a cocktail stick to place a hole in the had that a cocktail stick would fit into. Next I prepared a container with about 2 inches of cornstarch. First, I hollowed out an indention in the cornstarch for the head. Next placed a sandwich bag on top to keep the cornstarch from touching the head. After that I placed the head into the cornstarch to dry so it would retain its rounded shape. Once the head was dry, I temporarily placed a cocktail stick inside the hole to hold the head while I added the details. I added eyes, and mouth, and other details..
Attaching the Head to the Body
Next I attached the head to the body by adding edible glue and placing it onto the piece of uncooked spaghetti in the neck. This made the LEGO figures entirely edible. In retrospect, I recommend just using cocktail sticks to attach the head and the character to the cake and tell the customer about the cocktail sticks. I had to be extra careful with the dry spaghetti to make sure it did not break off during transport of the cake.
Also I added other colors of fondant for some of the details to the body and the head and painted the rest of the details to finish the LEGO Fortnite figures.
I also got a lot of inspirational ideas from Zoe’s Fancy Cake video on how to make a LEGO Wiydstyle figure.
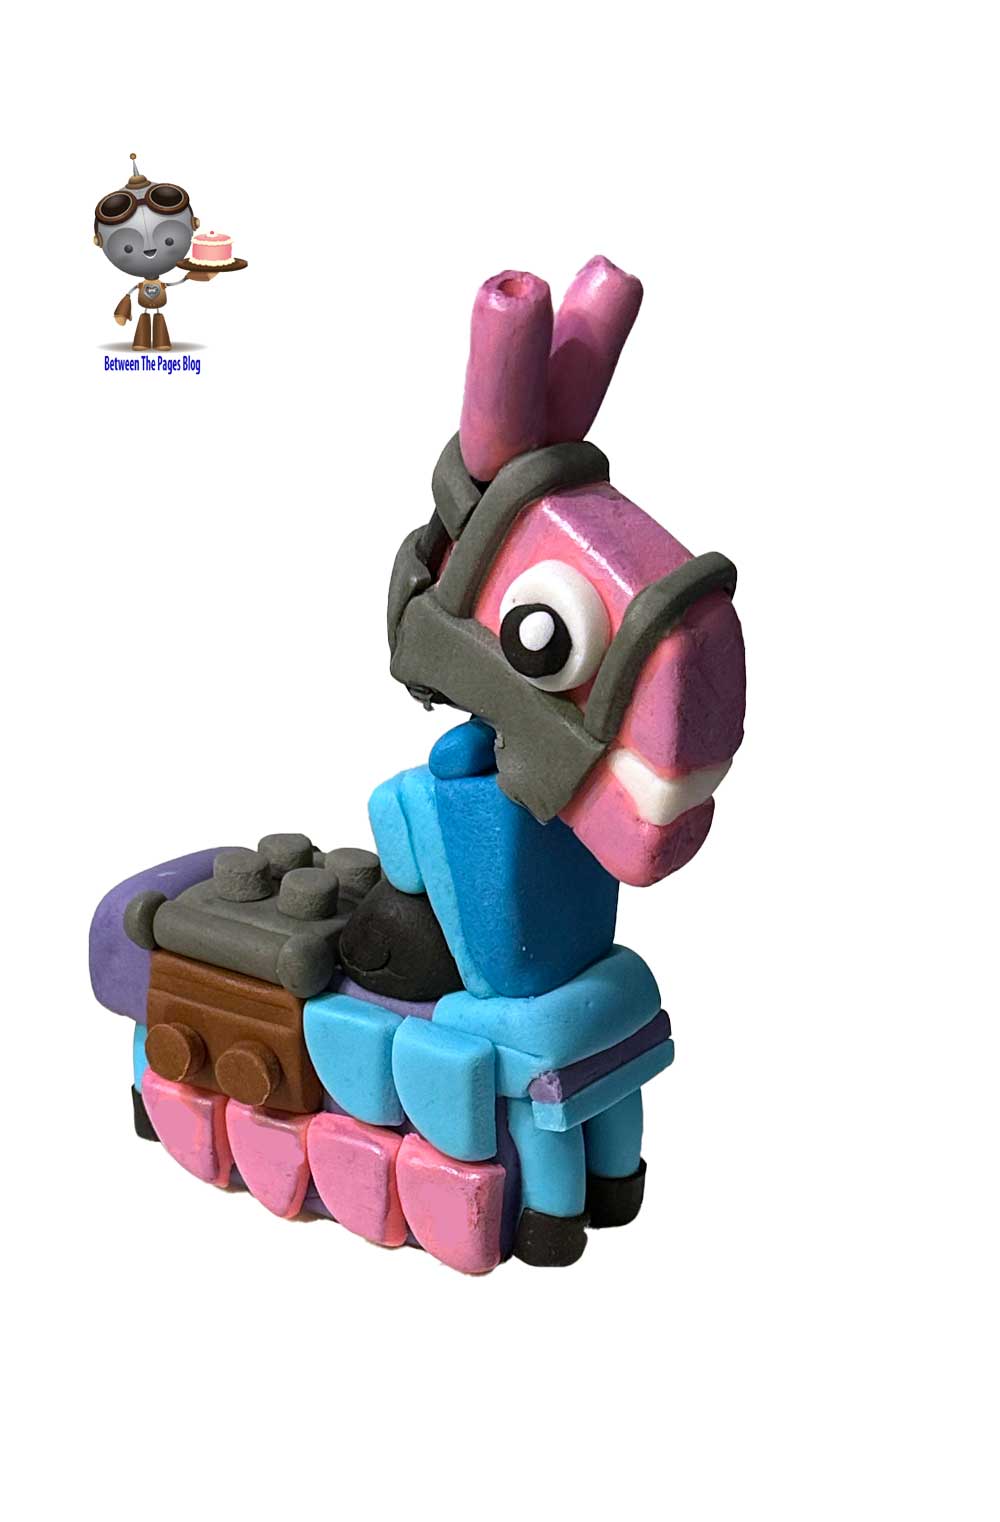
To Make the LEGO Loot Llama take a look at my LEGO Loot Llama Cake Topper tutorial.
Airbrushing The Blue Cake and Cake Topper Stand
I made the cake topper stand by using a sheetrock hole cutter to cut out the correct sized foam board circles. Next I glued the circles together and covered them in white fondant. Also I covered the bottom in fondant since it would be touching the cake. Next I wanted the bottom tier and this stand to be a vibrant blue. I airbrushed the blue for both the bottom 9 inch tier and the fondant covered stand for the LEGO Loot Llama Cake Topper.
Making the LEGO Fortnite Logo
I printed out a template. Next I used the scalpel to cut out the letters. I rolled out the fondant using the Fat Daddio’s Fondant & Dough Leveler Strips to make the letters the same thickness. Then I placed the fondant into the freezer for about 10 minutes to get the fondant cool so it would cut easier. After that I used a Swann Morton scalpel blade to cut out each letter.
To Make LEGO Logo
For LEGO, I cut out each letter, rolled out a really thin piece of black and placed the white letters on top and cut around the letters to make a black outline. Next I rolled out a really thin piece of yellow fondant and placed the black outlined letters on top. After that I cut out the yellow outline. Finally I cut out the red square and put it on top of a thin piece of black fondant and cut it to make the red square with the black outline. I used Tylose powder and water to attach the LEGO letters to the red square to make the logo.
To Make Fortnite Letters
After that in order to attach the Fortnite letters to an airbrushed cake, I took a piece of parchment paper and cut it so that there was an uncut straight edge to place against the cake board. In addition I made it the height of the bottom tier. I put Crisco onto the top side of each letter in Fortnite. Next I placed them with the back side of the letters facing up so that I could hold this against the cake. In this way the letters are properly lined up for the cake. I put tylose powder with water onto the back of the letters.
After that I gently placed the paper against the cake. Next I gently rubbed each letter to attach it to the cake and then pulled away the paper. As a result the letters were placed on the cake exactly where I wanted them to be. I carefully wiped the Crisco off of the front of the letters. Next I attached the LEGO logo just to the left of Fortnite using the tylose powder and water.
![]()
Placing Happy Birthday on the Cake Board
Next I used FMM Alphabet Tappits to make the letters and then used the edible tylose glue to attach them to the cake board. Since the child was turning 13, I made purple fondant LEGO bricks as candle holders. I placed a blue candle for 10 years and 3 white candles for each individual year past 10.
Here are some LEGO cake and cookies and some Video Game cakes and cookies that you may enjoy.
You may also like this Sonic the Hedgehog Cake that I made.
Here’s a terrific retro Video Game wedding cake with Mr. and Mrs. Pac-Man on the top of the cake.